Now that you've read about the drum's history and how lovely these drums sound it's time to turn to what can go wrong. No drum is perfect and all designs have drawbacks. The problems with these drums are related to rough handling, the shell being a cast material is brittle by nature and does not like to be dropped because it will not bend much before cracking. In the same manner you handle cymbals with care you also need to treat a cymbal alloy drum with care as well. Infact for strength rolled or forged structures are usually a much better bet, cast objects are almost honeycomb like in structure under a microscope. However, I think we can safely assume that the drum was designed more with sound in mind than being able to drive a car over it! The black chrome type coating is not the most durable around either and wear is very common. I've been told that at some point in the production run N&C switched to black powder coating as per the later aluminium Alloy Classic drum to get round this. Careful treatment is the key here, you can't throw these around like most other snare drums. A well padded snare drum case is a must and a very cheap investment given what these drums are worth. Well after seeing one of these come up for sale on a well known auction website cheap I couldn't resist to bid, my plan was if this drum sounded as good as the other one I'd sell the nicer looking one for what it owed me and keep this for it's sound. Sound over looks is always my priority and I didn't need two of these drums! Unfortunately the courier decided to put a spanner in the works. The parcel arrived in what seemed like good condition, however:


Crack Behind Tube Lug Crack Inside the Shell

Above: There may be trouble ahead!!

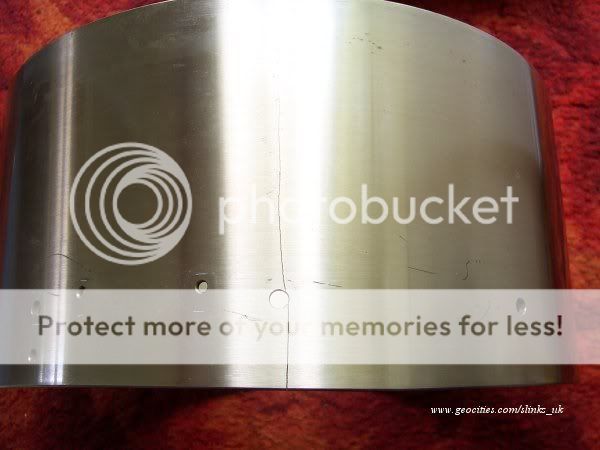
Sure enough sneaking along behind a tube lug was a big crack through the entire width of the shell wall and 2/3's of the drum depth. The tension rod on this lug was bent indicating an impact. The problem was not an impact with an object glancing into the box but the weight of the drum itself. Despite having some packaging in the box it arrived in (although in all fairness this should have been beefed up to suit the drum weight), the inertia of almost 20lbs of snare drum trying to suddenly stop on a tube lug nodal point had taken it's toll... time for a better look at the damage:

Cracked Shell

Above: Things aren't looking good at this point in time...

In addition to the broken shell, all the black coated parts were in poor condition and looked decidedly more tatty than the auction picture revealed. The courier could not get into their heads this was inertia related damage of the box being dropped square on its side from a height. They repeatedly stated that since the box was not a complete mess they were not paying up on the insurance! As is the case with many insurance policies they are simply not worth the paper they are written on. After the whole thing dragged on for months with emails bouncing back and forth with no progress in sight I decided there was no point in pursuing this with a company thousands of miles away who weren't interested. Moral of the story... use a better courier next time! This was an expensive learning curve for sure and the drum was shelved whilst I did some info gathering on the best way to repair it, early indications were it might be a write off so I had nothing left to lose now!

The biggest hurdle was to find an effective way to repair the cast shell. The main considerations are the effect on tone and the temperature of the repair itself, a badly warped shell is useless no matter how it sounds. Since musical instruments such as bells can be repaired it seemed logical to assume a cast drum shell could also. Here are the options:

1.The most basic method would involve making a metal plate with the correct radius and drilling the shell carefully to fix it in place. This would have looked awful though.

2. Brazing was considered briefly but this would involve heating the shell to dangerous levels and possibily melting / warping it. Besides I think this would have killed off the tone once and for all.

3. Lastly soldering was considered, but what type of soldering? This question was answered for me by Joe Montineri, to whom I'd like to say thank you to for the info. He had actually seen a few of these fail right the way through the shell (I was even told about a few drastic cases where the shell had actually been smashed into several pieces by Gary at Noonan)! Here's Joe's solution via email:

Hi, I've repaired a few of these successfully. You need to have a jewellers torch, low temperature silver solder, + the correct liquid flux. Most importantly some torch + flux 'skills'. The result will be a silver looking hairline blem, if held together properly! Good Luck, Joe

I did consider doing this myself by practicing on a few cracked cymbals, but the drum shell is a lot thicker meaning it would be harder to heat up to the right temperature. In addition there is more than one type of jewellers blow torch and various types of silver solder! In the end I entrusted the work on the shell to a jeweller to get a nice result. Meanwhile it was time to examine the other parts. The black finish was rubbed off randomly on all the parts and it did look awful. Due to the shell damage a lot of the value was already gone so I decided the objective was now to go for a tidy looking player drum. I closely examined the Noble & Cooley black coating itself and it was obvious it had been applied to a normal chrome layer underneath so in keeping with the "what do I have to lose" philosophy I decided to take an educated guess and go for plain chrome. Now to remove the Black coat... after experimenting with different chrome cleaners I hit on a resonably aggressive one which wouldn't leave huge scratches like wire wool and such and lo and behold the coating started coming off fairly easily to my amazement! With a few hours to kill and some elbow grease here's the result of an experiment which I wouldn't usually dare attempt given the value of these drums:

Before and After... Before and After...
Lugs Hoop

Above: The gamble paid off and not only are the parts now tidy looking but Black Coat wear is now a thing of the past!

Now it was all down to the jeweller to deliver the goods!

Unfortunately all had not gone well since the jeweller had not bothered to strap the shell and had relied purely on tacking one end with solder whilst heating the other end! Needless to say the whole lot heated up and the shell sprung apart once the tack melted. The crack was now even worse and the shell had suffered distortion and couldn't even float a head. Here is what I was now up against:

Cracked Shell

Above: It's a cracker!!!

I made the decision to attempt the repair myself, things had hit rock bottom on this project and at least I could monitor things my way and work at my own pace. The first job was to make up a jig that would hold the shell in place effectively. I also had to factor that it needed to squeeze the shell back to round and allow it after heating and soldering to settle in the correct shape. There's no text book out there on the best method to repair these drum shells so it was simply a case of creating homemade tools as ideas presented themselves. With the help of my good mate Al and his impressive home workshop (from which many a project appears) we set upon building the external parts. We also figured we needed something to push against on the inside of the drum. Here's the result:

Making the Inner Piece Complete Jig Assembly

Above: Left: Inner piece / Right: Complete Jig

The jig was so over engineered it could easily manipulate the shell shape back to round. At this point it was all down to settling on a decent soldering method.

I used silver solder rods with the correct flux and to heat it up I used a setup similar to a oxyacetylene torch except the fuel was Mapp gas. Due to the concentrated heat only a low setting is needed to avoid melting the shell! There were a few other problems which raised their heads during the course of the exercise. The first was that I found simply filling the crack with solder gave insufficient mechanical strength and when I sanded it down to make it nice cosmetically there was a loud "ding" which came from the shell and it came apart again suddenly and totally cracked this time. The answer I decided was to tack the outside of the shell with solder and then cut a small gentle concave channel about 10mm wide and 1.5mm deep at the maximum point on the inside of the shell following the crack which I could flood solder into and make a much stronger joint. The theory being this was in effect a fairly large surface area for the solder to bite in across but would leave enough meat in the shell so the torch didn't try to cut it in half! This proved to work very well mechanically but lead to a second problem: the extra heat necessary to do this had made the shell expand to the point it was pushing outwards against the jig and had caused a few extra small cracks on the edge of the shell where the casting had pits. It really does underline the unpredictable nature of cast structures and I can now see why nobody in England was prepared to give this a go and offer any kind of guarantee. Fortunately these were easy to solder up after the main repair was done. It was just a case of perserverence and constant inspection as the process was running. Once the soldering was completed I ended up at this point:

Fixed Shell

Above: The shell is fixed and almost ready to go!

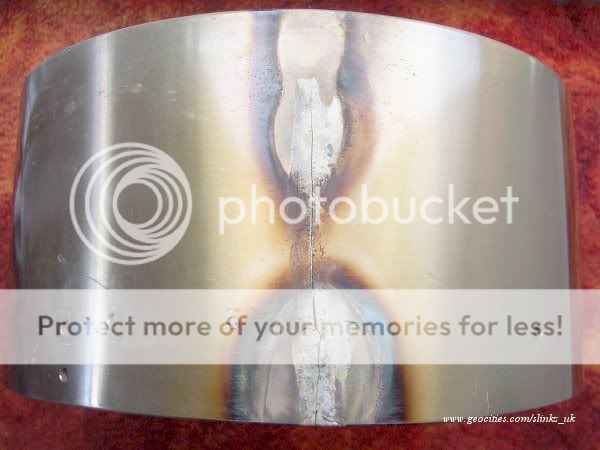
The solder did tend to run around a bit and in the picture the solder seam looks quite pronounced although it's actually fairly flat. I decided not to sand down the inside of the shell and leave it as it is for maximum strength. If the shell sounded too choked later on I'd always have the option of taking some solder off. There were still a few things to negotiate at this point and most of it was cosmetic. The first thing to do was to clean up the outside of shell, it was covered in oxidisation, flux and dripped through solder. This took hours of careful sanding by hand with a block, I avoided using machines to be sure I wasn't removing too much shell material, you can't replace it later on! What I ended up with was pretty much a silver line in the shell where the crack had been:

Sanding back the finish Silver blemish

Above: Left: Rubbing down the solder and oxidisation / Right: Silver Blemish

All was going pretty well at this point and any high spots were rubbed down on the shell edges to make sure the drum could float heads without undue force. Although slightly distorted it now looked like I might end up with a working drum from what most people had told me was now a certain write off.

I already knew I had a shell that could float heads so I performed a mock build at this point to see how the tube lugs lined up relative to the hoops by winding in a set of tension rods just using my fingers. Obviously any distortion in the shell would be a factor, unlike lug casings with threaded inserts which would allow the tension rods some leeway I had no such luxury with tube lugs. Immediately two were slightly out but fortunately they were inset two much rather than outset (which would have meant re-jigging and soldering the shell) and I figured I could simply use washers to space them out correctly. This simple fix worked 100%. I noticed the lug where the crack had been needed to have the hole in the shell adjusted slightly to bring it back into square. This only took about 5 minutes with a round hand file. The second was then to remove the existing laquer and corrosion ready for the shell to be resprayed with new lacquer as shown:

Restoring the finish

Above: By using a finer grade of wet and dry paper with a block and sanding in the same direction as the original machined grooves you can see the finish really coming back once the old lacquer and corrosion pits were removed.

Now I had everything mechanically lined up I took the shell off to spray a few coats of lacquer on. Afterwards I assembled the complete drum and added Puresound Blaster snare wires which worked very well. Here then is the finished drum after many hours of work, and a lot of trial and error:

Restored Zildjian Snare Drum

Above: The toughest restoration project to date but well worth it!

You might be wondering how that crack in the shell cleaned up so here it is:

Repaired crack

Above: A very small blemish which is hardly noticeable is the only clue from a close glance the drum has had some work.

The next stage was to tune the drum similarly to my other N&C Zildjian and check the difference in sound. I found that the unrepaired drum had slightly more ring but once they were both dampened down to normal usage levels the difference was almost undetectable, in short the drum sounded brilliant and sonically the repair was spot on! It was now time to dig out some decent competition and test the repaired drum against the best snare drums I have:

Soundcheck Lineup

Above: Here are the drums used to check the sound quality, an original unrepaired N&C Zildjian, 1920's Heavyweight Brass, and a 70's Super Sensitive. The repaired drum kept up easily and was a total success.

If you are ever unfortunate enough to break one of these drums or have a courier do it for you at least you'll now be aware that it is technically possible to repair the shell. It's hard work for sure and great care is needed not to overheat the shell when soldering. Some distortion is bound to happen but as long as it can float heads and the tube lugs all line up you should be in business. Expect to use a fair bit of elbow grease polishing off all the flux, solder and corrosion. The solder only has a small impact on the sound to the point where it's hardly noticable once dampened a little. All in all a very effective solution it seems. I wish any prospective Zildjian shell restorers the very best of luck!